TopoResize Tool – Resize Your Android data.img File (ext2, ext3 and ext4)
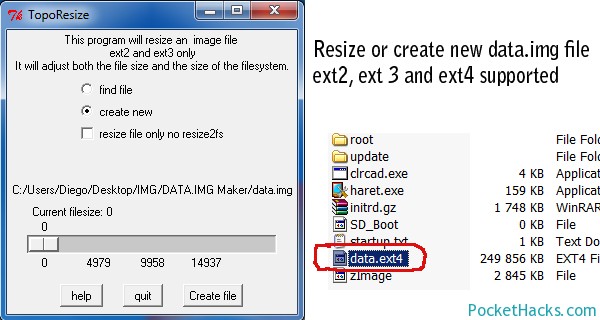
Resize or create your own data.img file for any Android SD build without Linux/Unix distro or command prompt editor, with TopoResize (toporesize-0.7.1.zip) you can do that straight from your Windows PC! With this tool you can create a brand new data.img or add/subtract space from an existing data.img – ext2, ext3 and ext4 file systems are supported.
For example:
You can take a 256MB data.ext4 and make it convert to a 2GB data.ext4 , maximum space possible shown is based on the HDD or SD space left. So you could create a 100GB data.img if the drive had 100GB free space, TopoResize is completely safe to use and won’t do anything to damage an existing data.img file.
Download TopoResize – click here.
toporesize-0.7.1.zip – THIS VERSION WORKS ON WINDOWS 10 X64.

More info from the author @ XDA-Developers forums:
You will need WinRar or 7zip to extract the .RAR for this download.
WARNING!: DO NOT MAKE YOUR DATA.IMG Larger than 2GB because Android will not recognize the SD Card after. I will test this later.
1024 = 1GB
2048 = 2GB
4096 = 4GB
8192 = 8GB
Just double the #!
Screenshot:
2euk6e1.png
How to make a NEW(Fresh) Data.img:
NOTE: In order to start NEW you must have wiped your SD card or removed every file or folder such as: .REC, Cache, Android, OLD Data.img & any apps that took a folder on the card.
1. Open TopoResize
2. Select “Create New”
3. Select Save destination such as the SD Card & name it data
4. Select “Create File”
5. Select ext2 or ext3
6. Hit Ok & it will autorun.
DONE!
How to add space to an existing Data.img:
1. Open TopoResize
2. Select “Find File”
3. Locate file & select it
4. Use the size slider to select the extra space
5. Select “Resize File”
6. It will autorun
DONE!
How to subtract space to an existing Data.img:
Same instructions apply to add space just use the slider to go down & select resize file.
How to read the system.ext2 & transfer it over to the desktop:
1. Open Ext2explore
2. Select File & Open Image
3. Goto the system.ext2 & select it
4. Select Save
5. Select a destination to save it to. (Save it to a folder is preferred, so make one.)
INSTRUCTIONS TO CREATE A NEW or MODIFY EXISTING DATA.IMG via Command Prompt:
1. Open Command Prompt
2. Goto the directory of Data.img Maker
3. Enter dd if=/dev/zero bs=1M count=XXX >> data.img (XXX = Amount of Space for NEW such as 256MB is 256. Also if file is 256 already add 256 to make modified data.img = 512MB)
Alternative method! Instead of dd. You can use the following (only for new data.img):
Enter tfile data.img XXX (XXX = Size of MB ex. 1024 = 1GB. For new data.img only)
Alternative method! Instead of dd. You can use the following (only for modify data.img):
Enter Resize2fs -p data.img XXXXXX (1024*512MB=524288, always use 1024 times amount of space like 1024MB=1GB, so 1024*1024MB=1048576 for modify data.img only, can skip dd & just run this command for modify!)
4. Enter Mke2fs data.img (This will actually partition it so it doesnt come out as a bad read, MODIFY DATA IMAGE DOES NOT APPLY TO THIS STEP!)
5. Enter Resize2fs -f data.img (This will resize it for MODIFY ONLY! NOTE: can skip if you did the alternative method for existing!)
6. Enter E2fsck -f data.img (This checks to make everything is correct)
DONE!
Creating NEW Example:
d:\Software\DATA.IMG Maker\DATA.IMG Maker>dd if=/dev/zero bs=1M count=512 >> dat
a.img
rawwrite dd for windows version 0.6beta3.
Written by John Newbigin <jn@it.swin.edu.au>
This program is covered by terms of the GPL Version 2.
512+0 records in
512+0 records out
d:\Software\DATA.IMG Maker\DATA.IMG Maker>mke2fs data.img
mke2fs 1.40.6 (09-Feb-2008)
data.img is not a block special device.
Proceed anyway? (y,n) y
Filesystem label=
OS type: Linux
Block size=1024 (log=0)
Fragment size=1024 (log=0)
131072 inodes, 524288 blocks
26214 blocks (5.00%) reserved for the super user
First data block=1
Maximum filesystem blocks=67633152
64 block groups
8192 blocks per group, 8192 fragments per group
2048 inodes per group
Superblock backups stored on blocks:
8193, 24577, 40961, 57345, 73729, 204801, 221185, 401409
Writing inode tables: done
Writing superblocks and filesystem accounting information: done
This filesystem will be automatically checked every 25 mounts or
180 days, whichever comes first. Use tune2fs -c or -i to override.
d:\Software\DATA.IMG Maker\DATA.IMG Maker>e2fsck -f data.img
e2fsck 1.40.6 (09-Feb-2008)
Pass 1: Checking inodes, blocks, and sizes
Pass 2: Checking directory structure
Pass 3: Checking directory connectivity
Pass 4: Checking reference counts
Pass 5: Checking group summary information
data.img: 11/131072 files (9.1% non-contiguous), 18858/524288 blocks
Alternative examples:
Using tfile to create fresh data.img instead:
D:\Software\DATA.IMG Maker\DATA.IMG Maker>tfile data.img 512
data.img
sizeMB= 512
Using resize2fs only to resize w/o anything else:
D:\Software\DATA.IMG Maker\DATA.IMG Maker>resize2fs -p data.img 524288
resize2fs 1.40.6 (09-Feb-2008)
Resizing the filesystem on data.img to 524288 (1k) blocks.
Begin pass 1 (max = 30)
Extending the inode table XXXXXXXXXXXXXXXXXXXXXXXXXXXXXXXXXXXXXXXX
The filesystem on data.img is now 524288 blocks long.

The download link is now updated and working, TopoResize tool is working on Windows 10 64 bit.